Records Management no longer exists only in the
Records Center in SharePoint 2010; it is present throughout SharePoint
libraries and lists. A document can be declared a record no matter which
library it is found in.
Once a document is declared as a record,
organizational policies can applied. Due to the oversight of entities
such as Sarbanes-Oxley, DOD certification, ISO certification, among
others, it is imperative that organizations manage a document from
cradle to grave. The administrator should be aware that this depends on
the requirements of the governing body. It is not realistic to believe
that SharePoint 2010 meets every certification need out of the box.
We also live in a society of litigation, which means
every piece of information in an organization is subject to scrutiny.
Records Management helps the administrator to be proactive to these type
of initiatives when they happen. Records Management is how we manage
what happens to a document. This recipe will go through how to enable
and declare a record.
Getting ready
Set up a team site prior to performing this recipe.
You must be a site collection owner of the team site where records will
be declared.
How to do it...
Navigate to the team site. Click Site Actions and then Site Settings.
Under the Site Collection Administration section, click Site collection features.
Locate the In Place Records Management feature and click on the Activate button.
Navigate back to Site Settings.
Click the new menu item named Record declaration settings under Site Collection Administration.
Fill in the required details on the ensuing page.

Click OK.
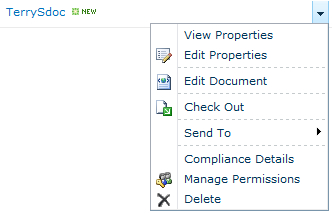
Click Shared Documents and upload a document to the library if one does not exist.
Hover over the document and click on the drop-down item Compliance Details.
The following pop-up screen appears:
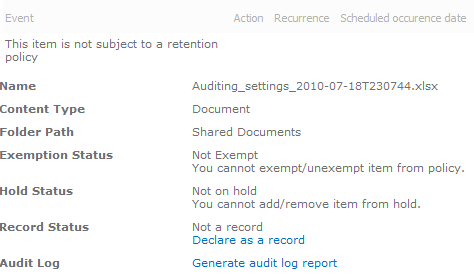
Click on the Declare as a record link.
You will get a pop-up window asking your permission to lock down an item for editing. Click OK.
The record is processed and is now shown with a lock on the file icon, as seen in the following screenshot:

How it works...
As shown in the recipe, documents stay in their
original location when declared as a record. They do not need to be
routed to a central location such as Records Center. In the prior
recipe, we saw how routing works.
In place Records Management is enabled at the site
collection level, as shown in step 3. This brought us a new menu item
pick that was configured in step 6. There were three sections that allow
the configuration of managing records.
The first section, Record Restrictions,
pertains to the editing and deletion of records. The second section is
for the manual declaration of records. If this is marked as Not Available..., then a workflow or policy must be configured to declare a record. This would be done through the use of managed metadata.
The last section pertains to the permissions of who
can do what. In the recipe shown, all could declare a record but only
list administrators could undeclare a record.
There's more...
While the configuration for declaring records was
shown at the site collection level, it can be overridden at the document
library level.
Do this by navigating to the document library and clicking on the document library settings on the ribbon. There is a Record declaration settings menu item under Permissions and Management.
Clicking on this brings up the following page:

Clicking OK overrides the site collection settings.
More info
In step 9, we used the Compliance menu item in the document drop-down list to declare the document as a record.
Another way to accomplish this would be to check the box next to the document, click Documents under Library Tools on the ribbon. There is a button (which has a drop-down list associated) called Declare Record.
It is more efficient to use this when there is a need to declare more than one document as a record.